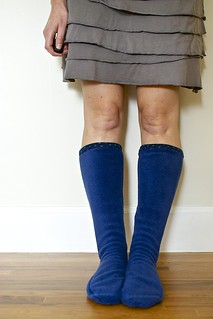
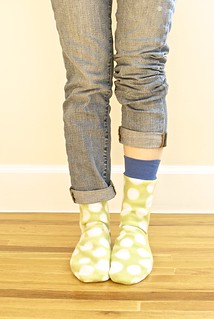
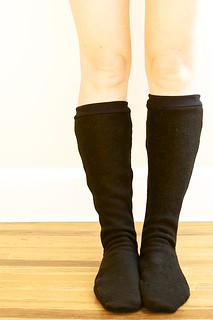
As promised, and before I forget, here is the in depth review for the Green Pepper polar socks pattern ($7). This pattern can be bought at Joann's, it is located on the metal carousels by the pattern books, it might also be available from your local fabric store such as Nuttall here in Holladay. For this project I am using a Bernina 580, provided by Bernina USA and my good friends at We All Sew.


I have made several modifications to the pattern, and have found that in general the calf height is sufficient for a child (5-6 years old) while the knee high sock is much "cuter" on a grown woman or a teenage girl.
Choosing your fleece:
Of the three type of polar fleece tried here I found that anti-pill polar fleece (bought in the remnant bin at Joann's) was the best. It also launders very well. The two other kinds were micro fleece and blizzard fleece. They are respectively the most difficult and the easiest to sew with. Micro fleece is a nightmare to sew with, it is similar to minky and any long-arm quilter will tell you that it stretches and sags in depressing ways. Blizzard on the other hand is super easy to sew, and that is because it doesn't have much stretch. It's a problem when making socks, they need more stretch and after wearing the green and blue ones for day I can also attest that they would need a stronger sole. Anti-pill really falls in between those two when it comes to sewing the layers together, but it has the perfect amount of stretch and happens to be very affordable, we have a winner!
Choosing your Thread and Needle:
When sewing knits on a regular sewing machine it is possible to experience skipped stitches even with a ball point needle. In this case it is a good idea to use a stretch needle. They are not the same thing, the shape of the eye is different enough to completely eliminate the skipped stitches. For this project I advise you to use a stretch needle size 90.
The thread should be polyester to stretch along with the fabric. You can use Coats and Clark, Gutterman or my personal favorite Mettler. You will use a lot of thread during this project so I suggest making a couple of full bobbins from the get go.
TIP: use a thread that goes well with your polar fleece and matches your cuffs and you will not have to re thread a single time.
Prepare your pattern:
Because this pattern is not very large I have found it easier to simply make scanned copies on my printer than to trace it. Even the largest piece only require taping once. At this point, if your shoe size falls in between to sizes I recommend you either cut right in between the line or go up one size. These socks are really best suited to wear at home without shoes. Making the sock too short will result in discomfort due to the heel seam.
The pattern gives you a choice between a wide or narrow sole. I have found even the narrow sole to be too wide for me and after making a test pair I have made the following adjustments:
Remove about 1/2" from the front of the sole making a dart towards the heel. Cut along the lines and tape the paper halves together again. See Pictures bellow:
TIP 2: Do not include the notches when cutting out your fabric. You can mark them with a pen if you absolutely want to but do not cut! the seam allowance is tiny (1/4") and you will most likely end up with holes where the notches should be.
TIP 3: Cut two sole pieces per foot if you will be wearing the socks in the house. it makes them much warmer and does not add any difficulty during assembly.
Always pay attention to the grain and follow the markings on the pattern pieces closely.
Sew at last!
You are now ready to sew, if you are making more than one pair in the same color way which can be done with one 7/8 of a yard cut if your feet are small, you can chain stitch each step.
TIP4: Take advantage of the machine knot (securing) button. When using complex overlocking stitches it is not always practical to back stitch. I also like the automatic thread cutter, it saves on bobbin thread and leaves the smallest of ends to clip.
The first step is to attach the two heel pieces together. This step is easy and you will not experience much distortion. Following the creative consultant I choose stitch #20 (Xs and strait stitches) with foot 1C. It is a strong seam finish that the Bernina 580 seems to sew particularly well. After trying out different stitches and fabric I recommend skipping the second step completely. It is awkward to sew such a small seam allowance to the heel piece as it is very curved. You will most likely see your seam get distorted and it does not make the sock more comfortable.
The same overlock style stitch may be used for the entire sock construction. To attach the cuff or binding to the sock however I prefer to use a slightly widened and elongated zig zag, I used both regular knit fabric (used for leggings) to make a binding and black ribbing to make cuffs (see green pair and black pair). The cuffs are of course much faster to sew but not as "cute".
Final tip: I love making these socks, they have become my go-to footwear when I am at home but don't let you enthusiasm for them let you forget to clean the lint from the bobbin area and oil your machine. Fleece is one of the greatest lint maker and lint soaks up all the oil your machine needs to run smoothly.
Happy Sewing! I hope you enjoyed this review and that you will give this classic inexpensive pattern a try this winter. If you liked this kind a review/entry let me know as I am thinking of making pattern reviews a part of this blog on a regular basis!


I love this review. Someday when my little ones are in school for longer periods, I hope to try out this pattern! They combine function and fashion!
Posted by: Natsdistractions.wordpress.com | October 15, 2013 at 10:10 AM
YES! Please do make pattern reviews a regular part of your blog! I have a couple of children who would enjoy having some of these fleece socks so I will have to give them a try. Ugh! You keep adding to my to-do list Juliette!!! ;) Thanks for sharing all you learned!
Posted by: Lisa | October 15, 2013 at 10:36 AM
This was so incredibly helpful! It was so easy to read and understand. I am learning how to sew more clothes and I'm especially grateful that you did this. I hope you continue to do reviews! Thank you.
Posted by: Terri | October 15, 2013 at 03:26 PM
All great information . . .look forward to making some socks this winter . . I will have to grab this pattern!
Posted by: Gwen | October 16, 2013 at 05:15 PM